Shopping
Cart Overview
When you find an item you want to order, you add it to a shopping
cart. With appropriate privileges, you can have up to eight shopping
carts at a time. If you have multiple shopping carts, OneSource IT
will add your item to the active cart. If you have no shopping carts,
OneSource IT will create one when you add an item.
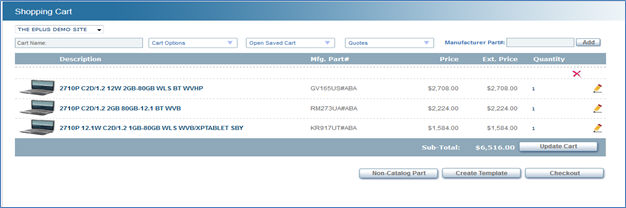
Viewing
Contents of a Shopping Cart
To view the contents of a shopping cart:
1. To
open the active cart, click the shopping cart icon at the top of the
screen. The active shopping cart opens.
2. After
opening the shopping cart, you can rename or empty it, add items or
notes, change quantities, create a new cart, or check out.
To rename the cart, input the new name
in the Cart Name in the field and press Update Cart.
Adding
Items to Your Cart
You can add an item to your shopping cart from the results list,
product detail view, Accessories tab or comparison view. You can also
add an item (by item ID) to the cart in the shopping cart detail view,
as described in Modifying
a Shopping Cart.
If you already have one or more shopping carts, OneSource IT will
add the item to the active cart. If you have no shopping carts, OneSource
IT will create one when you add an item.
To add an item to your cart from either the results
list or the product detail view:
1. In
the quantity box next to the shopping cart icon, type the number of
items that you want to add to the cart.
2. Click
the shopping cart icon. The item is added to your cart in the quantity
you specified.
3. The
"Items in Cart" number at the top of the screen increments
by one each time you add an item (in any quantity).
Note: The
"Items in Cart" refers to line items - not individual products.
You can also add items to your cart from the Accessories
tab, the Comparison
view, and the Standard
Catalog.

Adding
Non-Catalog Items to Your Cart
The Non-Catalog Item Request page makes it easy to order items
that are not in the OneSource catalog.
To request an item not in the OneSource catalog:
1. To
request an item not in the OneSource catalog, click on Non-Catalog
Item in your Shopping Cart.
2. On
the Non-Catalog Item Request page, enter the following information
for each item you want to request:
3. If
you need to request additional items, click the Add Another Item
hyperlink at the bottom of the page.
4. After
you have entered information for each item you want to order, click
Submit. The requested item is added to the active cart.
Modifying
Your Shopping Cart
In the shopping cart detail view, you can change the name of the
cart, update item quantities, add items by Part #, add or remove notes,
and remove line items.
Note: Modifying the cart will
make it the active cart.
To modify your shopping cart:
1. Open
the shopping cart detail view as described in Viewing
Contents of a Shopping Cart.
2. In
the detail view, you can modify your cart in any of the following
ways:
· Edit
the name of the cart.
· Edit
order quantity for any item.
· Type
an item number in the Part # field and click Add to add the
item (quantity of 1) to your cart. It will appear as a new line item.
You may then increase the quantity, if you wish, as described in the
previous step.
· Click
 at
the end of a line item to remove the line item from the cart.
at
the end of a line item to remove the line item from the cart.
· Click  at the
beginning of a line item to attach a note for the ePlus Sales team
regarding the item. Click
at the
beginning of a line item to attach a note for the ePlus Sales team
regarding the item. Click and
click on Delete to remove a note.
and
click on Delete to remove a note.
3. Click
Update Cart at the bottom of the screen to save your changes.
To
Empty Your Shopping Cart
To empty your shopping cart:
1. Open
the shopping cart detail view as described in Viewing
Contents of a Shopping Cart.
2. Click
Empty Cart at the bottom of the shopping cart page to remove
all items from your cart.
Creating
a New Shopping Cart
To create a new shopping cart:
1. Open
the shopping cart detail view as described in Viewing
Contents of a Shopping Cart.
2. Click
Create New Cart at the top-right of the shopping cart page.
OneSource IT creates a new empty cart and makes it the active cart,
and displays it in detail view. With appropriate privileges, you can
have up to eight shopping carts at a time.
Note:
OneSource IT creates a new shopping cart for you automatically whenever
you have no carts and choose to add an item to your cart.
Checking Out
You use the "Checkout" feature to submit your OneSource
IT order.
To check out:
1. Open
the detail view of the shopping cart that you want to check out. (For
more information, see Viewing Contents
of a Shopping Cart.)
2. From
the Shopping Cart page, there are two ways to go to the Route Order
page:
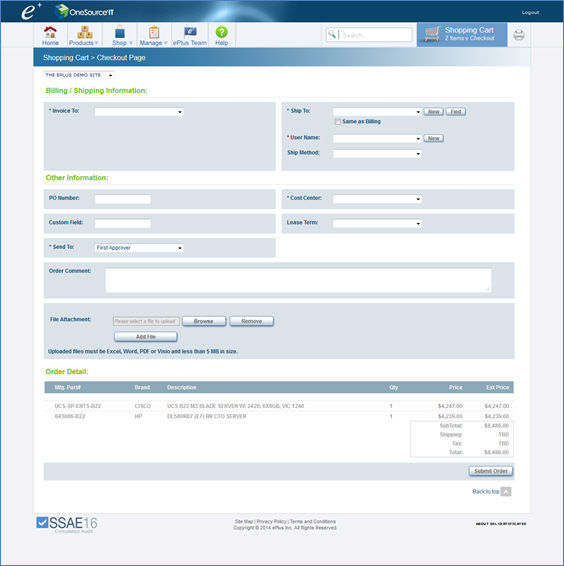
3. In
the Route Order page, enter the following information (an asterisk
appears next to the Send To, a required field). Note that when
you create an order, One Source IT automatically populates several
of the fields that appear on an order with the defaults set in the
My Preferences page of your user account record, simplifying the order
entry process:
· Ship
To (Address): Select from the drop-down list. Users with appropriate
privileges can add new addresses to the drop-down list by typing them
in this field and then clicking the Save for Next Time option.
(Users with appropriate privileges can also manage shipping addresses
by clicking the Shipping
Addresses tab from the My Account menu.)
This field enables you to search for an address by entering one or
more keywords. When you search by keyword, OneSource IT returns addresses
that contain the entered keyword(s), which you can then select from.
· Ship
Contact: Enter a first and last name or select from the drop-down
list. Users with appropriate privileges can add new contacts to the
drop-down list by typing them in this field and then clicking the
Save for Next Time option. (Users with appropriate privileges
can also manage shipping contacts by clicking the Shipping
Addresses tab from the My Account menu.)
· Shipping
Method: Select your preferred shipping method from the drop-down
list.
· PO
Number: Enter the purchase order number.
· Order
Comments: You can use the Order Comments field to enter any additional
information that you want to submit to ePlus Sales with your order.
Note that the comments entered here appear in the confirmation email
notification One Source IT sends to you after you submit your order.
· Order
Note: Additional customer-specific data fields may appear in the
page. If so, complete the fields as needed. These fields can
be configured to appear for specific steps (i.e., approvers) in the
approval workflow process an order is assigned to. Organizations not
using the workflow feature can still use these data fields.
· Invoice
Notes: Use the Invoice Notes box to enter accounting information
(such as project number, cost center, business unit, etc.) that will
print on the ePlus invoice and packing lists.
· Send
To: If workflow is enabled, select the approver you want
to send the order to. After you submit your order for approval and
processing, OneSource IT sends an email notification to the selected
approver.
4. To
process your order, click the Submit button at the bottom of
the screen.
· If
the order is entering an approval
workflow queue, the order will appear on the Requisitions page,
which you can access by clicking Approvals in the Manage box.
You will be notified by email when your order is approved or rejected.
File Attachment
You can also upload a file (format Excel,
Word, or Visio) less than 5MB in size.
· If
workflow is not enabled and your order is going directly to OneSource
IT, OneSource IT assigns the Submitted to ePlus status to the
order, and your order will appear on the Order Status page, which
you can access by clicking Status in the Manage box. You will
receive email confirmation of your order. Note that the email confirmation
you receive is populated with the order information entered here in
the Route Order page for your order.
Note:
Upon checkout, the shopping cart is deleted and OneSource IT creates
a new, empty cart so that you can begin a new order.
5. To
return to the Home page, click the Return Home link at the
bottom of the page.
Related Topics:
Workflow Overview
Requisitions
Pending
Orders
Backorders
The description of every item in OneSource IT catalog includes availability.
Ordering items that are out-of-stock or in short supply may result
in a backorder. Backorder status is indicated on the Pending Orders
page. The duration of backorders varies and depends on many factors.
If you have questions about a backorder, contact your ePlus Sales
Representative.
Discounts
and Rebates
The pricing that you see in your OneSource IT catalog reflects pre-negotiated
terms established in the contract between ePlus and your organization.
In general, any additional discounts or rebates do not apply.
Manufacturer rebates
– Although manufacturer rebates may be factored into the cost
calculations that determine OneSource IT pricing, this is not
visible to the customer. Manufacturer mail-in rebates are not
available through OneSource IT.
Volume purchase or shipping
discounts – OneSource IT does not offer volume discounts above
and beyond the terms established in the customer contract with
ePlus. Orders entered separately (i.e., at different times, in
different shopping carts) are processed separately and generally
cannot be combined to reduce shipping costs.
Reseller or dealer discounts
– OneSource IT does not offer any type of discounts above and
beyond the terms established in the customer contract with ePlus.
Order Changes
and Corrections
If you have any questions about an order you have already placed,
contact your ePlus Sales Representative. He or she can help you answer
questions such as:
I inadvertently placed a duplicate order. What should
I do now?
Can I add, change or remove items from my order after
it has been submitted?
What should I do if an item is missing from my order?
Your ePlus Sales Representative may be able to change or cancel
your order if necessary. Orders that are voided or cancelled cannot
be reactivated.
Ordering FAQ
1. Does
OneSource IT accept phone, fax, email or snail mail orders?
No. OneSource IT accepts orders through
the OneSource IT Web site only.
2. Which
states require their residents to pay sales tax for OneSource IT orders?
ePlus is registered to collect sales
tax on orders to most U.S. states. For more information, please contact
your ePlus Sales Representative.
3. I
am a tax-exempt government employee. How do I place an order with
OneSource IT without being charged for tax?
Customers who provide a valid exemption
certificate will not be charged for tax.
4. Does
OneSource IT support credit card transactions?
OneSource IT does not support credit
card transactions.
5. May
I pay using a check?
You can pay by check or through your
open terms account. You select one or more of these payment options
when you set up your OneSource IT account.
6. Can
I establish a credit limit for purchases?
ePlus sets a credit limit on every
OneSource IT customer account.
 ©2014
ePlus inc. All rights reserved. ePlus, the ePlus logo, and all referenced
product names are trademarks or registered trademarks of ePlus inc. All
other company names and products mentioned herein are trademarks or
registered trademarks of their respective companies.
©2014
ePlus inc. All rights reserved. ePlus, the ePlus logo, and all referenced
product names are trademarks or registered trademarks of ePlus inc. All
other company names and products mentioned herein are trademarks or
registered trademarks of their respective companies.